How I Set up My Canvases in Procreate
- Isabelle

- Dec 2, 2020
- 3 min read
Updated: Jan 20, 2021
This week, I wanted to take it back to the basics. Setting up a canvas is the very first thing you do when you open the Procreate App or any digital art platform for that matter. So the very first thing you need to know how to do before you can make digital art is setting up the drawing space. There are a few ways you can start depending on what you would like to accomplish, and artists find their own way to do it eventually. Read on to learn how to set up your canvas!
Setting Up a Canvas

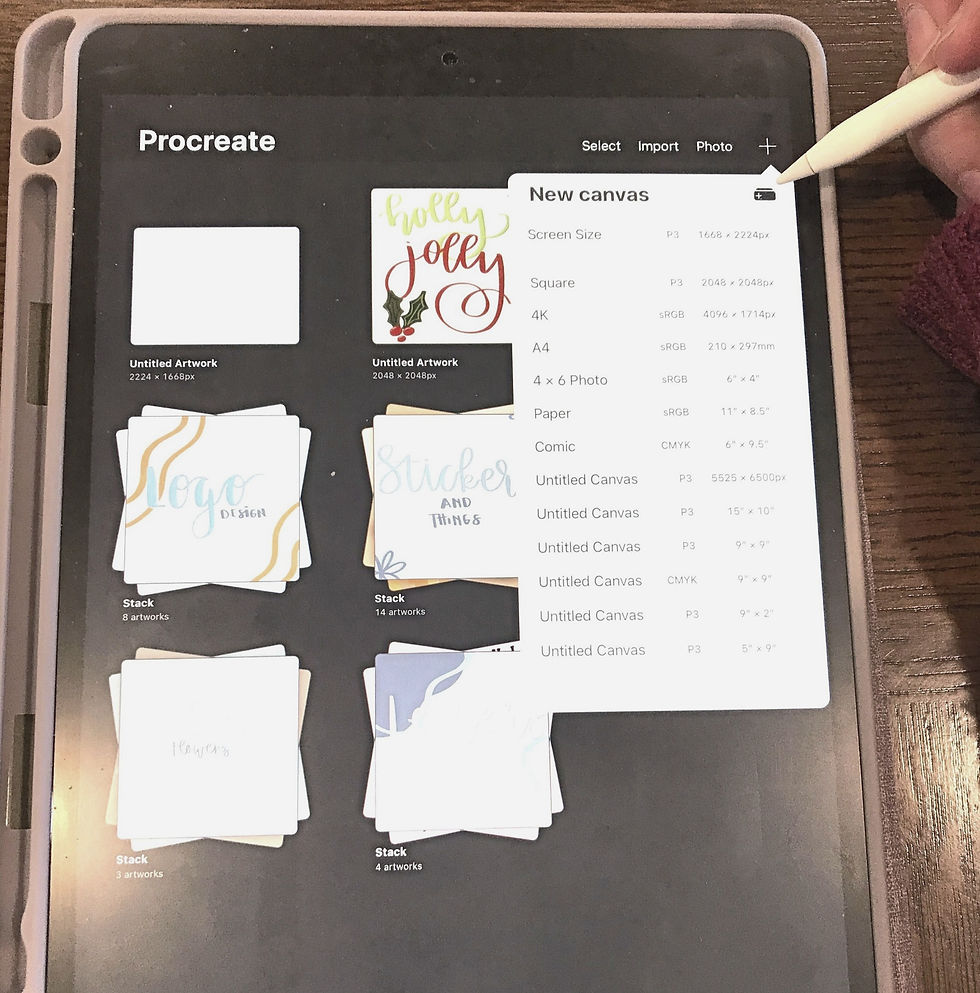
When you open the Procreate App, you will see a plus sign in the top right corner. You can tap on this to open one of the preset canvases that are available, or you can tap on the little rectangle with the plus sign in it to customize your own size. When I am doodling, I tend to choose the 2048 x 2048 px. It is just a good square size and is big enough so it doesn't get too pixelated. Once you tap on your canvas type, it will open and you are ready to go. Here is a really good video from the Procreate creators on how to create your own canvas preset.
For Online Posting
Posting online is how you are going to get your artwork out to the public. But there are a million different ways you can do that. From Instagram posts and stories to Facebook profile pictures and headers, there are so many options for posting. This means that there are lots of different sizes depending on the type of post you make. Luckily, you can post a square to most things, but if you want a drawing to fit a story perfectly, you need to know your ratios and sizing for different posts. Unless you are creating content for a brand daily, you won't need to memorize these (and even most industry professionals don't have these memorized). This is my go-to website for finding exactly what size I need. I, for the life of me, can never remember the dimensions for Instagram stories, but with this website, I can pull it right up. It seems like such a small detail, but it really makes a difference and will make your life so much easier when you have the correct dimensions before you post. They have compiled a list of every possible kind of post to make, and what the dimensions for that are. This is really helpful to check your sizes to make sure your post will work across all platforms.
For Printing

If you want to print your artwork either to make framed prints or even stickers, you will have to set up your canvas a little bit differently. Your screen gives you colors using RGB, or mixtures of red, green, and blue to make every color you see. However, when you are going to print a project, you will need it formatted in CMYK, or cyan, magenta, yellow, and key (black) to make colors. When you go to open a canvas, select the little rectangle with the plus sign and then select "color profile" from the left side of the screen to get the option to change your canvas to a CMYK. It is important to note that your colors may look a little less vibrant since RGB cannot directly translate to CMYK, but it is essential if you want to print. Creating the right size of the canvas is up to you really. To make sure that I get exactly the sizes I need, I select the "dimensions" and change the unit to inches. When doing stickers, I make my canvas size the same size as my printer paper and duplicate the sticker I am making to fill the page. This helps me make sure that it comes out with the most detail. Everyone has their own way of doing this, but this has been the easiest for me. Also on the dimensions tab, in order to make sure your prints come out nice and crisp, is you need to change your DPI (kind of like PPI, which means pixels per inch) to something greater than 300, but nothing less.
Now that you know the basics of setting up a canvas, go ahead and try it out! Soon you'll have your own set of canvases that you turn to every time.


Comments